Showing posts with label Sumsung. Show all posts
Showing posts with label Sumsung. Show all posts
Wednesday, 16 September 2015


samsung C3010 Network Problem Solution

Samsung C3010 Network Problem Repairing Solutions are available in the following article. Samsung C3010 Network Ways and Jumpers information can also be found in the diagrams further in this post. In Samsung C3010 Network Problem or Signal Problem can occur because of the faulty Network IC also known as Power Amplifier(PA) or Antenna of the
samsung C3010 Insert SIM Ways Problem Solution

Samsung C3010 Insert SIM Problem Repairing Solutions are available in the following article. Samsung C3010 Insert SIM Ways and Jumpers information can be found in the diagrams further in this post. In Samsung C3010 Insert SIM Card Problem can occur because of the faulty SIM Card Connector, SIM IC or it’s bad connection to the
samsung C3010 Mic Problem Ways Solution

Samsung C3010 Mic Problem Repairing Solutions are available in the following article. Also you will find Samsung C3010 Mic Ways and Jumpers information in the diagrams further in this post. In Samsung C3010 Mic Problem can occur because of the faulty Microphone or it’s bad connection to the Cell Phone’s Motherboard. So before doing any
Monday, 14 September 2015
Samsung Galaxy Core II Power On Off Button Ways
Samsung Galaxy Core II Power On Off Button Ways
Here is the solution for Samsung Galaxy Core II key not work on / off problem. This solution may help fix if the phone shows charging indication or charging icon when the battery charger is plug-in, but could not or can not turn it on.
Samsung Galaxy Core II Power On Off Key Jumper, Track, Ways
Samsung Galaxy Core II On

Samsung Galaxy Core II In the power ON-OFF, other than it is in the matrix keyboard flex is also connected to the keyboard filter IC. The solution below shows the connection line paths of the power key, this is useful without changing the filter IC and this can be used without having to connect the power key filter IC.
Just refer to the solution given below and track said main power line roads.
Only manage to apply a jumper wire in places where the Samsung Galaxy Core II connecting said power key. This can help change without compromising the IC filter matrix or keyboard flex.
Samsung Galaxy Core II,Nokia,Power Button,Power Key,Power Switch,On Off Button, On Off Switch, Powerr Problem
Samsung I9300 Galaxy S III Display Light Problem Solution Jumper
Samsung I9300 Galaxy S III LCD Display Light IC Solution Jumper Problem Ways
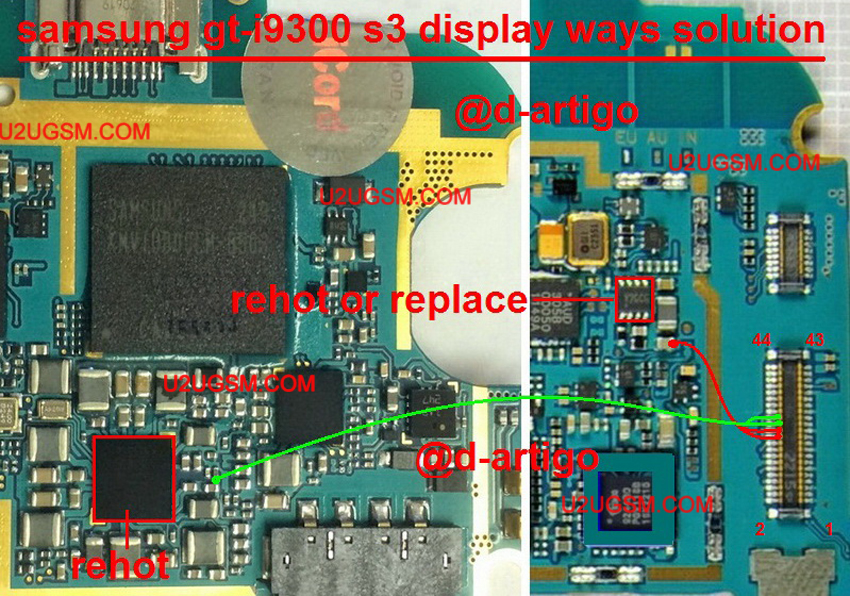
if lcd light is not workin in Samsung I9300 Galaxy S III then we will not be able to watch any text on display.light can be dim or may be blank.Samsung I9300 Galaxy S III LCD Display Light IC Solution Jumper Problem Ways can be solve in a few steps as given in this post.

after dis assambling Samsung I9300 Galaxy S III chek mother board if there is any carbon water damage or rust.clean whole board with electronics cleaner and then apply hot air for a few mints so that it can be dry.
replae led if it is a jack lcd and if it is pasted then after removing check its prints value.if value is ok then replae lcd and if alue is missing then check whole parts componenets as iven in above diagram.check all paths and if any tracks of them is missing apply jumpers.
it will help you to solve Samsung I9300 Galaxy S III LCD Display Light IC Solution Jumper Problem Ways
easly.
For more information and new tips and tricks about this problem solution keep visiting this page we will update it if there will be new updates.some related post are also given below you can read more about mobile phone.
Please note that although every diagram & solution posted on our website has been tested by one or more members of our team before posting,so we will not be responsible for any loss or damage, including personal injury.Use this repair solutions at your own risk.
Samsung I9300 Galaxy S III,Nokia,LCD,Display,Solution,Jumper,Proble,Ways
Samsung I9300 Galaxy S III LCD Display Light IC Solution Jumper Problem Ways LCD Display Light Not Working
Samsung I9300 Galaxy S III,Nokia,LCD Display Light,Display Light Problem,Display Light Solution,Display Light Jumpers,Display Light Ways,White Display ,Blinking Display,Blank Display,Keypad Light
if lcd light is not workin in Samsung I9300 Galaxy S III then we will not be able to watch any text on display.light can be dim or may be blank.Samsung I9300 Galaxy S III LCD Display Light IC Solution Jumper Problem Ways can be solve in a few steps as given in this post.
after dis assambling Samsung I9300 Galaxy S III chek mother board if there is any carbon water damage or rust.clean whole board with electronics cleaner and then apply hot air for a few mints so that it can be dry.
replae led if it is a jack lcd and if it is pasted then after removing check its prints value.if value is ok then replae lcd and if alue is missing then check whole parts componenets as iven in above diagram.check all paths and if any tracks of them is missing apply jumpers.
it will help you to solve Samsung I9300 Galaxy S III LCD Display Light IC Solution Jumper Problem Ways
easly.
For more information and new tips and tricks about this problem solution keep visiting this page we will update it if there will be new updates.some related post are also given below you can read more about mobile phone.
Please note that although every diagram & solution posted on our website has been tested by one or more members of our team before posting,so we will not be responsible for any loss or damage, including personal injury.Use this repair solutions at your own risk.
Samsung I9300 Galaxy S III,Nokia,LCD,Display,Solution,Jumper,Proble,Ways
Samsung I9300 Galaxy S III LCD Display Light IC Solution Jumper Problem Ways LCD Display Light Not Working
Samsung I9300 Galaxy S III,Nokia,LCD Display Light,Display Light Problem,Display Light Solution,Display Light Jumpers,Display Light Ways,White Display ,Blinking Display,Blank Display,Keypad Light
Samsung Galaxy S III Verizon Camera not Working Problem Solution
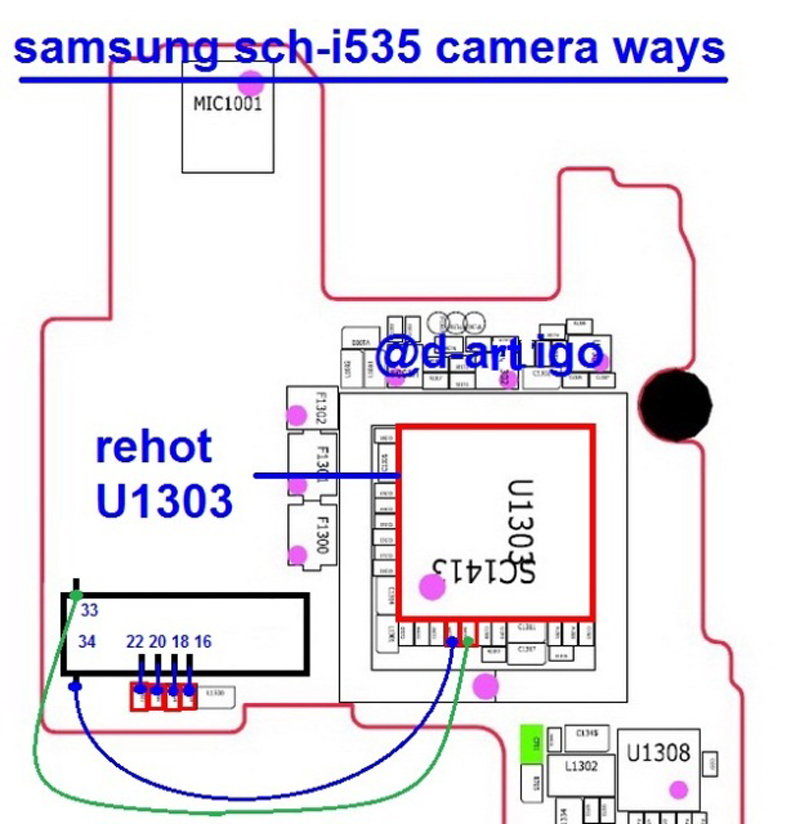
Samsung Galaxy S III Verizon sch-i535 Camera not Working Problem Solution Samsung Galaxy S III Verizon sch-i535 Camera not Working Problem Solution Samsung Galaxy S III Verizon sch-i535 camera
try to replace it with a new camera
rehot camera ic LDO in U600 and U601
if it is still as before .... check the voltage of his work in C609 and enable it in the R606 camera and his camera clock at Samsung Galaxy S III Verizon sch-i535 see the picture below

only thank button
Samsung Galaxy S III Verizon sch-i535 Camera not Working Problem Solution
I had a chance again to repair the Samsung Galaxy S III Verizon sch-i535 after swimming in sea water, after the general recovery remained faulty camera error "Unexpected error. Restart your phone " .
By simple inspection, found that there is no supply voltage of 1.8 volts camera. Responsible for it marked on the stabilizer circuit phone Samsung S8500 as N1515 , unfortunately without any labeling. First I would like to power the camera from the voltage VIO is also 1.8 volts, the camera certainly earned after I gave food, but the phone went to reboot after a few seconds the camera.
Replacement stabilizer N1515
Find similar stabilizer of phones Nokia , which is on disassembly I could not, but found the stabilizer to the required settings in the phone Samsung D900 . Stabilizer from Samsung is marked R1114D181D-TR-F and position number U320 , where he also serves as a stabilizer on the camera. That's him, the camera on the phone began to work as expected, without any reboots. Stabilizer is made in a small package, place it on the board Nokia N8 was not difficult. Firstly removed the faulty N1515 and choke L1515 us as they are no longer needed, connect terminal B1 and B2 together and connected to the 6th conclusion (switching control), A2 is connected to the 1st conclusion (supply voltage Vbat ), to simplify layout and minimize wires mounted second conclusion is soldered to the body and the third output (output of 1.8 volts) on C1 . In general, a compact and properly. More clearly seen in the photo:
try to replace it with a new camera
rehot camera ic LDO in U600 and U601
if it is still as before .... check the voltage of his work in C609 and enable it in the R606 camera and his camera clock at Samsung Galaxy S III Verizon sch-i535 see the picture below
only thank button
Samsung Galaxy S III Verizon sch-i535 Camera not Working Problem Solution
I had a chance again to repair the Samsung Galaxy S III Verizon sch-i535 after swimming in sea water, after the general recovery remained faulty camera error "Unexpected error. Restart your phone " .
By simple inspection, found that there is no supply voltage of 1.8 volts camera. Responsible for it marked on the stabilizer circuit phone Samsung S8500 as N1515 , unfortunately without any labeling. First I would like to power the camera from the voltage VIO is also 1.8 volts, the camera certainly earned after I gave food, but the phone went to reboot after a few seconds the camera.
Replacement stabilizer N1515
Find similar stabilizer of phones Nokia , which is on disassembly I could not, but found the stabilizer to the required settings in the phone Samsung D900 . Stabilizer from Samsung is marked R1114D181D-TR-F and position number U320 , where he also serves as a stabilizer on the camera. That's him, the camera on the phone began to work as expected, without any reboots. Stabilizer is made in a small package, place it on the board Nokia N8 was not difficult. Firstly removed the faulty N1515 and choke L1515 us as they are no longer needed, connect terminal B1 and B2 together and connected to the 6th conclusion (switching control), A2 is connected to the 1st conclusion (supply voltage Vbat ), to simplify layout and minimize wires mounted second conclusion is soldered to the body and the third output (output of 1.8 volts) on C1 . In general, a compact and properly. More clearly seen in the photo:
Samsung Galaxy Ace 3 S7272 Usb Charging Problem Solution Jumper Ways
Samsung Galaxy Ace 3 S7272 Usb Charging Problem Solution Jumper Ways
Problem:-
Samsung Galaxy Ace 3 S7272 usb charging solution,
Samsung Galaxy Ace 3 S7272 usb not recognised not detected

Diagnostics:-
Plug in usb cable into PC and Phone jack, Read notifications on the screen phone recognised or not. Check out you can save data to memory card or not. Replace usb data cable and try again.
Replace Usb charger and try again can it charge or not.
Solution:-
If you are facing charging problem in Samsung Galaxy Ace 3 S7272 and have test all above steps to solve this problem in it. Dis assemble the phone and then look at phone for water and carbon damages. Make it clean with electronics cleaner and apply heat with heat gun to make it dry.
Keep in mind heat should not be more and much because it can harm your skin and damage the mother board. So keep it in normal flow and look at the parts carefully.
Track all these paths and components as shown in diagram above. all these tracks are given in different colors so that you can find out the jumper ways easily.
Samsung Galaxy Ace 3 S7272,Usb,Charging,Problem,Solution,Jumper,Ways
usb not charging, Usb not recognized, charging not save, not charging
Problem:-
Samsung Galaxy Ace 3 S7272 usb charging solution,
Samsung Galaxy Ace 3 S7272 usb not recognised not detected
Diagnostics:-
Plug in usb cable into PC and Phone jack, Read notifications on the screen phone recognised or not. Check out you can save data to memory card or not. Replace usb data cable and try again.
Replace Usb charger and try again can it charge or not.
Solution:-
If you are facing charging problem in Samsung Galaxy Ace 3 S7272 and have test all above steps to solve this problem in it. Dis assemble the phone and then look at phone for water and carbon damages. Make it clean with electronics cleaner and apply heat with heat gun to make it dry.
Keep in mind heat should not be more and much because it can harm your skin and damage the mother board. So keep it in normal flow and look at the parts carefully.
Track all these paths and components as shown in diagram above. all these tracks are given in different colors so that you can find out the jumper ways easily.
Samsung Galaxy Ace 3 S7272,Usb,Charging,Problem,Solution,Jumper,Ways
usb not charging, Usb not recognized, charging not save, not charging
Samsung Galaxy Tab 2 7.0 P3100 Usb Charging Problem Solution Jumper Ways
Samsung Galaxy Tab 2 7.0 P3100 Usb Charging Problem Solution Jumper Ways
Problem:-
Samsung Galaxy Tab 2 7.0 P3100 usb charging solution,
Samsung Galaxy Tab 2 7.0 P3100 usb not recognised not detected

Diagnostics:-
Plug in usb cable into PC and Phone jack, Read notifications on the screen phone recognised or not. Check out you can save data to memory card or not. Replace usb data cable and try again.
Replace Usb charger and try again can it charge or not.
Solution:-
If you are facing charging problem in Samsung Galaxy Tab 2 7.0 P3100 and have test all above steps to solve this problem in it. Dis assemble the phone and then look at phone for water and carbon damages. Make it clean with electronics cleaner and apply heat with heat gun to make it dry.
Keep in mind heat should not be more and much because it can harm your skin and damage the mother board. So keep it in normal flow and look at the parts carefully.
Track all these paths and components as shown in diagram above. all these tracks are given in different colors so that you can find out the jumper ways easily.
Samsung Galaxy Tab 2 7.0 P3100,Usb,Charging,Problem,Solution,Jumper,Ways
usb not charging, Usb not recognized, charging not save, not charging
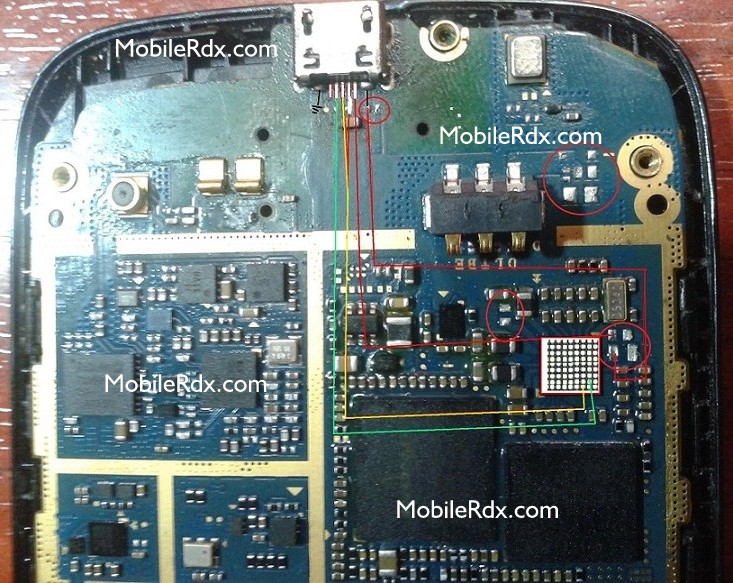
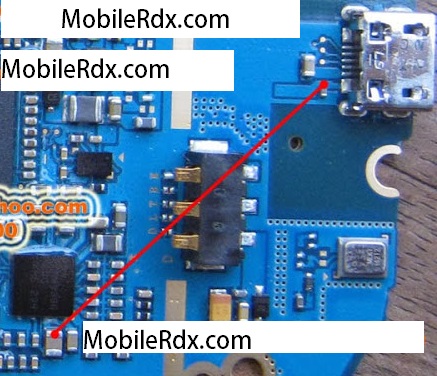
Samsung Galaxy S Duos 2 S7582 Not Charging USB Problem Solution
Samsung Galaxy S 2 Duos S7582 USB Charging Problem Solution Jumper Forms
Issue: -
Samsung Galaxy S Duos S7582 2 usb charging solution,
Samsung Galaxy S Duos S7582 2 USB not recognized undetected

Diagnosis: -
Connect the USB cable to the PC and the phone jack, Reading notifications on the phone screen or not recognized. Check out you can save data to the memory card or not. Replace the USB data cable and try again.
Replace the USB charger and retry may be charged or not.
Solution: -
If you are facing problems loading Duos S7582 Samsung Galaxy S 2 and have proof of all previous steps to resolve this problem in it. Dis mount the phone and then look in the phone water damage and carbon. Keep it clean with cleaning of electronics and apply heat with a heat gun to be dry.
Note the heat should not be more and more, because it can damage the skin and damage the motherboard. So keep in normal flow and look at the parts carefully.
Track of all these paths and components as shown in the diagram above. all these clues are given in different colors so you can easily find ways to bridge.
Samsung Galaxy S Duos 2 S7582,Usb,Charging,Problem,Solution,Jumper,Ways
usb not charging, Usb not recognized, charging not save, not charging
Issue: -
Samsung Galaxy S Duos S7582 2 usb charging solution,
Samsung Galaxy S Duos S7582 2 USB not recognized undetected
Diagnosis: -
Connect the USB cable to the PC and the phone jack, Reading notifications on the phone screen or not recognized. Check out you can save data to the memory card or not. Replace the USB data cable and try again.
Replace the USB charger and retry may be charged or not.
Solution: -
If you are facing problems loading Duos S7582 Samsung Galaxy S 2 and have proof of all previous steps to resolve this problem in it. Dis mount the phone and then look in the phone water damage and carbon. Keep it clean with cleaning of electronics and apply heat with a heat gun to be dry.
Note the heat should not be more and more, because it can damage the skin and damage the motherboard. So keep in normal flow and look at the parts carefully.
Track of all these paths and components as shown in the diagram above. all these clues are given in different colors so you can easily find ways to bridge.
Samsung Galaxy S Duos 2 S7582,Usb,Charging,Problem,Solution,Jumper,Ways
usb not charging, Usb not recognized, charging not save, not charging
Monday, 7 September 2015
Samsung Galaxy Win I8552 Usb Charging Problem Solution Jumper Ways
Samsung Galaxy Win I8552 Usb Charging Problem Solution Jumper Ways
Problem:-
Samsung Galaxy Win I8552 usb charging solution,
Samsung Galaxy Win I8552 usb not recognised not detected
Samsung Galaxy Win I8552 usb charging solution,
Samsung Galaxy Win I8552 usb not recognised not detected
Diagnostics:-
Plug in usb cable into PC and Phone jack, Read notifications on the screen phone recognised or not. Check out you can save data to memory card or not. Replace usb data cable and try again.

Replace Usb charger and try again can it charge or not.
Plug in usb cable into PC and Phone jack, Read notifications on the screen phone recognised or not. Check out you can save data to memory card or not. Replace usb data cable and try again.

Replace Usb charger and try again can it charge or not.
Solution:-
If you are facing charging problem in Samsung Galaxy Win I8552 and have test all above steps to solve this problem in it. Dis assemble the phone and then look at phone for water and carbon damages. Make it clean with electronics cleaner and apply heat with heat gun to make it dry.
If you are facing charging problem in Samsung Galaxy Win I8552 and have test all above steps to solve this problem in it. Dis assemble the phone and then look at phone for water and carbon damages. Make it clean with electronics cleaner and apply heat with heat gun to make it dry.
Keep in mind heat should not be more and much because it can harm your skin and damage the mother board. So keep it in normal flow and look at the parts carefully.
Track all these paths and components as shown in diagram above. all these tracks are given in different colors so that you can find out the jumper ways easily.
Samsung Galaxy Win I8552,Usb,Charging,Problem,Solution,Jumper,Ways
usb not charging, Usb not recognized, charging not save, not charging
Samsung E1200 Speaker Solution Jumper Problem Ways Earpeace
Samsung E1200 Speaker Solution Jumper Problem Ways Earpeace
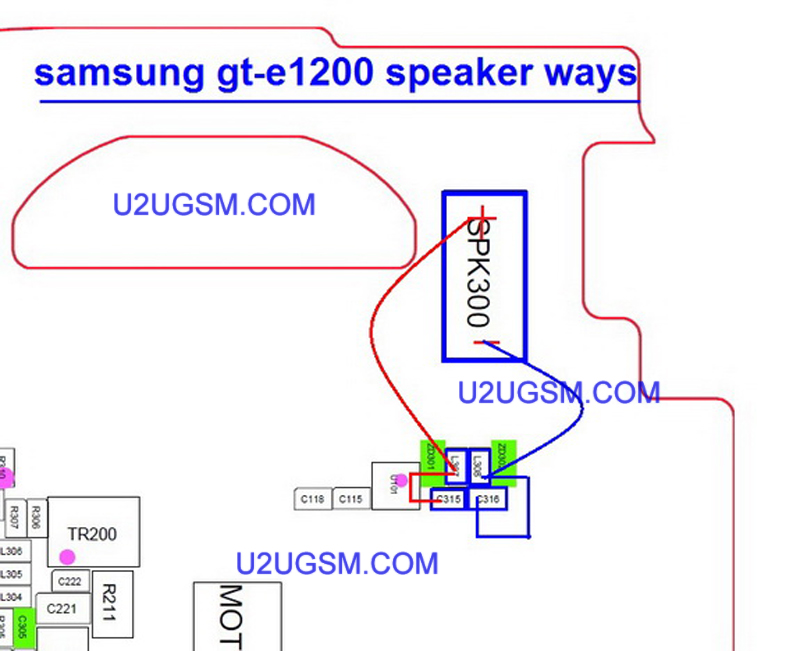
if we have a speaker problem in Samsung E1200 we will not be able to hear voice of call.we can temporary solve this issu by using Loud Speaker but to fix this problem we have to do a few basic diagnostics and steps to solve Samsung E1200 Speaker Solution Jumper Problem Ways Earpeace.

Open Mobile and check speaker points with a meter if they do not show continuty then speaker is dead and if they show a good value chak speaker attachement prints on board do they have value also then change speaker with new one.if speaker changing can not solve this issue check all these parts and track that used in speaker function in Samsung E1200.
Open Mobile and check speaker points with a meter if they do not show continuty then speaker is dead and if they show a good value chak speaker attachement prints on board do they have value also then change speaker with new one.if speaker changing can not solve this issue check all these parts and track that used in speaker function in Samsung E1200.
All parts components and tracks can be found in diagram above so check these components and also clean near by area of these parts.dry it with hot air and ceck all tracks with meter if missing apply jumpers and you may can change resold or replace these parts one by one till you solve Samsung E1200 Speaker Solution Jumper Problem Ways Earpeace
For more information and new tips and tricks about this problem solution keep visiting this page we will update it if there will be new updates.some related post are also given below you can read more about mobile phone.
Please note that although every diagram & solution posted on our website has been tested by one or more members of our team before posting,so we will not be responsible for any loss or damage, including personal injury.Use this repair solutions at your own risk.
Samsung E1200,Nokia,Speaker ,Earpeace,Solution,Jumper,Problem,Ways
Samsung E1200 Speaker Solution Jumper Problem Ways Speaker Not Working Earpeace
Samsung E1200,Nokia,Speaker,Earpeace,Speaker Problem,Speaker Solution,Speaker Jumpers,Speaker Ways
Saturday, 5 September 2015
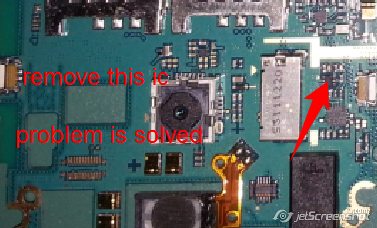
Samsung Galaxy Y Pro Duos Gt - 5512 Camera Failed On
Whenever I open the Camera app on my Galaxy Y pro Duos Gt-5512, it shows this awkward view on the display (as if some special effect is switched on). the 1st and 2nd files attached down show the view at the display of my phone whenever I open the camera app,
The 3rd image is the similar to 1st one using other(normal) camera.
In the rear camera mode when I click the capture icon on the screen it shows the error (shown in 4th image) it doesn't capture the image and the camera application exits. Also when I switch to front facing camera it shows the same awkward colors but I am able to capture the image using the front camera(it doesn't give any error, that is how I am able to attach the 1st and 2nd image.).
What shall I do to bring back the original colors in my camera?
PS- I have changed the phone's firmware couple of times. I even flashed the factory firmware, still its the same story. At present I use Custom ROM (Hatyon ROM v1.1), and Compact kernel 2.5.
Samsung Galaxy Y Duos S6102 Ear Speaker Jumper Problem Solution
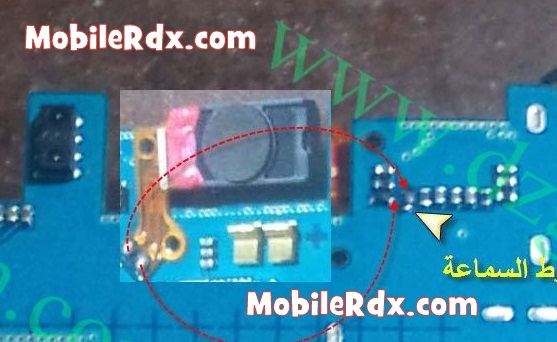
Samsung GT-S6102 Ear Speaker Ways Earpiece Line – On this occasion we will try to discuss the issue fixes speaaker Samsung Galaxy Y Duos S6102, damage to the speaker usually occurs because the speakers are in a damaged condition, exposed sand or water exposed to short-circuit, three things that mengakibatkn problems the speaker Samsung GT-S6102 simple steps to overcome the ear speaker.
Step first check the speaker holes in the casing, resulting in blockage speaker sound missing or very small.
The second step is of course to replace the speakers, the speakers often Samsung Galaxy Y Duos S6102 occurs because the speaker was broken, so just replace the * with the speaker, the speaker problem on Samsung S6102 can be resolved.
If the above steps do not resolve the problem, try the following steps just as in the picture below, check the lines one at a time, if there is a path-breaking, try the jumper.
OR
Samsung S6102 Ear Speaker WaysJUmper Earpiece Solution
Damage or repair errors caused by existing solutions in this blog are not the responsibility MobileRdx.com, we just want a little help you in improving mobile phone.
Damage or repair errors caused by existing solutions in this blog are not the responsibility MobileRdx.com, we just want a little help you in improving mobile phone.
Samsung GT-S6102 Ear Speaker Ways, Earpiece Jumper Problem Repair Solution, Samsung S6102 Ear Speaker Jumper Track Line Solution
Samsung Galaxy Y Duos S6102 Mic Solution Jumper Problem Ways Microphone
Samsung Galaxy Y Duos S6102 Mic Solution Jumper Problem Ways Microphone
Samsung Galaxy Y Duos S6102 Mic problem can be solve in a few steps as given in this post.How we can find Mic fault into a cellphone is very easy way.when ever our voice can not reach to destination monbile phone or we can not recored our own voice in voice recorder of cell phone it means it Mic not working.If a Samsung Galaxy Y Duos S6102 Mic is not working then Mic problem can be solve in given bellow steps that are provided in diagram bellow.

First step is open mobile and check Samsung Galaxy Y Duos S6102 Mic points on borad if there is a good value in it then change Mic with new one.Problem will be solve. if only mic points do not show value then chek all mic track and parts that are used in mic function in Samsung Galaxy Y Duos S6102.all mic parts and track are given in bellow diagram check all these parts and components and if necesory resold or change them.this will help you in Samsung Galaxy Y Duos S6102 Mic Solution Jumper Problem Ways Microphone

First step is open mobile and check Samsung Galaxy Y Duos S6102 Mic points on borad if there is a good value in it then change Mic with new one.Problem will be solve. if only mic points do not show value then chek all mic track and parts that are used in mic function in Samsung Galaxy Y Duos S6102.all mic parts and track are given in bellow diagram check all these parts and components and if necesory resold or change them.this will help you in Samsung Galaxy Y Duos S6102 Mic Solution Jumper Problem Ways Microphone
For more information and new tips and tricks about this problem solution keep visiting this page we will update it if there will be new updates.some related post are also given below you can read more about mobile phone.
Please note that although every diagram & solution posted on our website has been tested by one or more members of our team before posting,so we will not be responsible for any loss or damage, including personal injury.Use this repair solutions at your own risk.
Samsung Galaxy Y Duos S6102,Nokia,Mic,microphone,Solution,Jumper,Problem,Ways
Samsung Galaxy Y Duos S6102 Mic Solution Jumper Problem Ways Mic Not Working Microphone
Samsung Galaxy Y Duos S6102,Nokia,Mic,Microphone,Mic Problem,Mic Solution,Mic Jumpers,Mic Ways
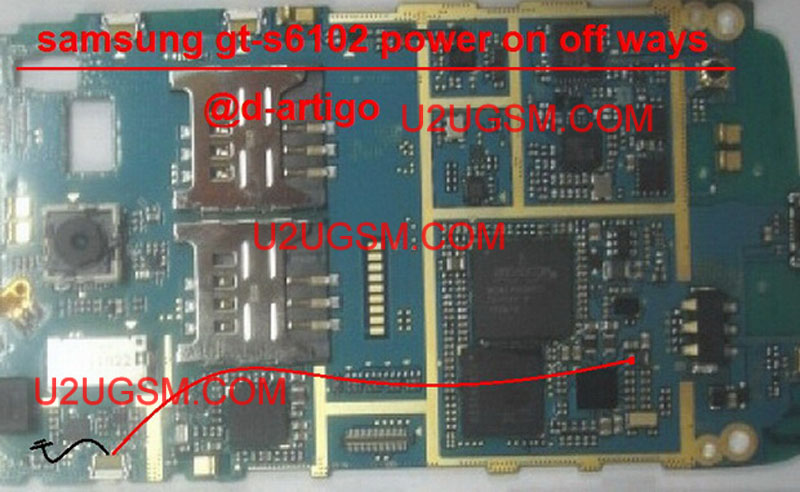
Samsung S6102 Power Button On Off Key Switch Jumper Ways
Samsung Galaxy Y Duos S6102 Power Button On Off Key Switch Jumper Ways
Samsung S6102 load ok, flash ok but not power on the phone, this means cutting power button / line problem.So now follow the ways of simple button on bridge.

When it comes to hardware, the first thing you need to do is re-solder strip button and check connector plate loose contacts.
If the above method does not work replace new strip button.
Check connection line paths of the power switch across each of the components in which it is connected.
When it comes to hardware, the first thing you need to do is re-solder strip button and check connector plate loose contacts.
If the above method does not work replace new strip button.
Check connection line paths of the power switch across each of the components in which it is connected.
If you are facing an energy problem in Samsung Champ Duos S6102 diagrams in this article can help. Continue with the following troubleshooting and build bridges necessary for the points that have been damaged.
Samsung Galaxy Y S6102 Keys Power Jumper
Samsung Galaxy Y Duos S6102 On Off Button Ways
Samsung S6102 does not start Solution Dead
Samsung Galaxy Y Duos S6102 On Off Button Ways
Samsung S6102 does not start Solution Dead
Samsung Galaxy Y Duos S6102 point button Trick damaged bridge. Trace point of damage to the meter or check off with a new one. We can check button problem connecting the phone to the charger with mobile entertainment indicator appears on the display and press the power button, then this is a problem of button. See diagram and apply jumpers as diagram.
Samsung GT-S6102 Not Charging Problem Jumper Solution
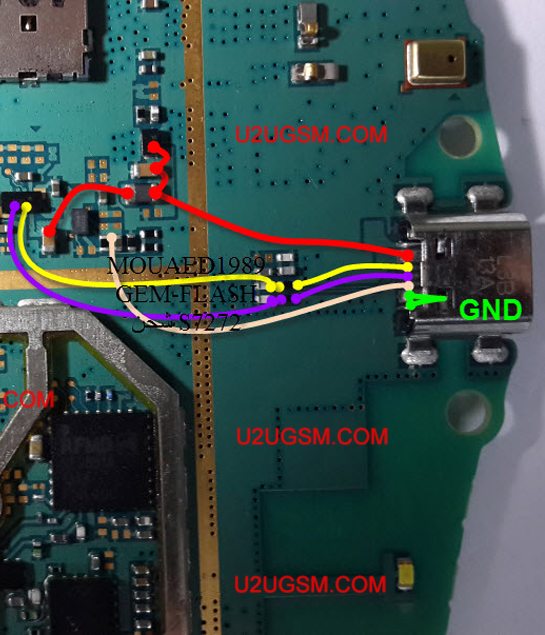
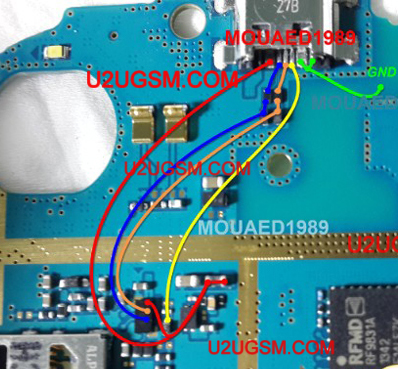
Samsung Galaxy Y S6102 Not Charging, Charging Ways Jumper Problem Solution and Trick Jumper Fuse — On this occasion We will share information about the Samsung S6102 Not Charging. if you want to try the trick from us please follow the instructions on the image below.
When you try to charge the battery on the Samsung GT-S6102 and get no response or no fill then this is often caused by the connector may be damaged, disconnected lines, fuses disconnected or does not deliver flow properly and the defective IC.
OR
The picture above is a guide to fix Samsung GT-S6102 Not Charging, Charging Not Supported, Bad Contact Charging and Line Charging disconnected. Well to make improvements please see the picture above.
Measures
Check the charging path
Check the fuse (if it breaks please make fuse jumper as shown above)
Check the capacitor and resistor (if defective this component will lead to charging is not supported)
Check the charging IC (if defective IC will usually result Charging is not supported and bad contact charging)
This it instruction from us may be useful.
Samsung GT-S6102 Charge Ways,Charging Problem, Not Charging Solution, Repair Usb Problem, Chargging Not Supported,Charging Ways
Friday, 4 September 2015
SAMSUNG G530H Galaxy Grand Prime Hard Reset
First method:
- At the beginning switch off your mobile phone by holding down the Power rocker for a short while.
- Afterwards press and hold together: Volume Up + Home button + Power button for a couple of seconds.
- When the Samsung Logo appears, you can release held keys.
- In the next step select from menu "wipe data / factory reset" using Volume buttons to navigate and Home button to confirm.
- Choose "Yes -- delete all user data" to confirm the whole operation.
- After that select option "reboot system now".
- Well done! The hard reset has just been performed.


Second method:
- Start by turninng on the device.
- From the Home Screen go to Menu and then to Settings.
- Tap Backup & Reset and then Factory data reset.
- Afterwards choose Reset device.
- To confirm your choice select Erase everything.
- That's all.
WARNING !
Hard Reset will erase all of your data
All described operations you are doing at your own risk.
Hard Reset will erase all of your data
All described operations you are doing at your own risk.
SAMSUNG G360 Galaxy Core Prime Hard Reset
First method:
- Check that your phone is on.
- Next from the Home screen press Menu -> Settings -> Backup & reset -> Reset device ->Erase everything.
- Confirm your choice, and wait to finich operation.
- That's all.

Second method:
- Press Power button, until your tablet is off.
- Now press and hold together: Volume Up + Home button + Power button, until you seeRecovery mode.
- Then select "wipe data / factory reset" using Volume buttons to navigate and Power buttonto confirm operation.
- Next choose option "Yes -- delete all user data".
- After that confirm option "reboot system now".
- Well done!


WARNING !
Hard Reset will erase all of your data
All described operations you are doing at your own risk.
Hard Reset will erase all of your data
All described operations you are doing at your own risk.
Subscribe to:
Posts (Atom)